Energy conservation has really messed with digital photography. Namely, the advent of fluorescent bulbs.
I’m talking, of course, about white balance. Used to be, you’d have one setting for incandescent bulbs and one for fluorescent bulbs. Now, thanks to advances in fluorescent light technology, my life as a photography can turn from “delight” to “living hell” with the flip of a switch. Usually the switch that turns on a bank of fluorescent lights.
Here’s why.
Every type of light has a different color, or wavelength. Daylight has one wavelength, while filtered sunlight (as seen through a cloud) has another. Artificial light sources – such as incandescent (also called Tungsten) bulbs or fluorescent bulbs – each have different wavelengths. This is not a problem with humans, because our eyes color correct. If I see you in a classroom setting under the not-so-flattering fluorescent lights, and then I see you out on the street in bright daylight, my brain will balance your skin tone so that my brain doesn’t perceive a difference. Our eyes and brains have AWB (auto white balance), and while yes, that’s an option with digital photography, I encourage most of my students to use a more specific white balance setting when they can.
To help the people who attend my digital photography workshops, I give them this chart:
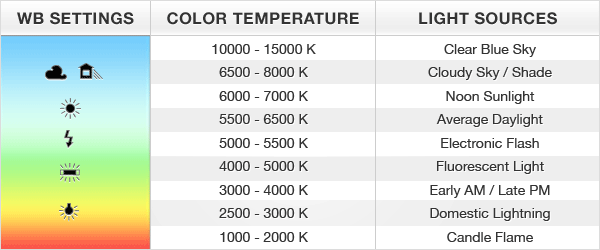
Source: ExposureGuide.com
It actually gives a little more information than most students need, because every digital camera’s white balance function has those little icons rather than the numbers. I use it to illustrate why white balance is a “thing” and also so everyone knows what those icons mean (I mean, really, the fluorescent light bar? In about 1/2 point size, no less… who can divine what the hell that means?)
And that works well… for everything except fluorescent lighting. Here’s why:
Used to be I could simply switch over to fluorescent when I had a fluorescent light source and the colors would be reasonably accurate. However, things have changed. Fluorescent lighting options have grown and while that’s a big win for all of our energy bills, it’s a big suck for photographers who now need to determine what sort of fluorescent light is illuminating their photo.
Case in point: My Nikon D7000 has seven different fluorescent settings under white balance: sodium vapor, warm white, white, cool white, day white, daylight, and high temperature mercury vapor.

Too. Many. Choices.
I don’t know about you, but I have no clue how to tell the difference between day white and daylight. I spent way too much time trying to Google the differences in lamp types. The Internet was profoundly unhelpful in this matter. Even if some standard existed that allowed digital photographers to match bulb shape and size with the itty-bitty icons on the camera display, there are too many places using fluorescent lights and combining types. Think about it: Say you’re photographing in a city recreation center, which almost always has fluorescent lights. Cool white is a great choice, usually. Except the person who orders the bulbs? Yeah, that position rotates, and sometimes the person ordering orders daylight and sometimes another person orders day white. I could bore you with infinite scenarios, but I think we all get the point I’m making.
However, there are two ways around this. Three, actually.
1. Test shots. Arrive early enough to step through each setting and see which setting gives you the result that most closely resembles what your eye sees. Use that one. This is the beauty of a digital SLR. If you have a digital point and shoot you may not have this option, and some DSLR cameras may not have this many options, either. If that is the case, don’t just set your white balance to “fluorescent” and assume it will work. It may not. Shoot a test photo or two.
2. Use your K. All this means is that you set your white balance wavelength. If the white balance settings on your digital camera (usually just DSLR but occasionally a digital point-and-shoot will offer this option as well) have a “K” setting, go to it. You can set the wavelength based on ambient lighting. While this implies you will need to know those numbers on that chart above, not really. See, here’s the brilliance: the color will change on your digital camera’s LCD display as you adjust the number. All you need to remember is that the number, for fluorescent, should be somewhere between 4000 and 5000. Play the numbers. Here, too, you’ll want a test shot. Or two.
3. Automate it! Although I generally eschew any “auto” settings on digital cameras – especially for my students who have paid for DSLR cameras – I am not as Draconian about this when it comes to white balance. Fluorescent lighting is one of the reasons why, but there are other times, too – like when you have mixed sources (daylight streaming through a window while overhead lights offer supplemental lighting.) If you really can’t solve a lighting scenario, it’s OK to go to AWB, or auto white balance, on the white balance setting.
So, there you have it. A practical guide to shooting under fluorescent lights. As always, email me with any questions, and check out one of my photography workshops in the St. Petersburg area (right side of the page).
